- 03 January 2026
- WordPress (25)
Background
Originally, I had free SSL certificates setup for the multiple sites across my WordPress Multisite, which was setup by my hosting provider’s support team at Tsohost. They’ve since migrated me to one of their new cPanel plans and when I asked about the free LetsEncrypt SSL setup that I’d lost due to the migration, they told me that the new plan does “not have integrated AutoSSL/Let’s Encrypt”. When I asked if the LetsEncrypt plugin could be added to my control panel they said “we can not provide any guidelines on installing a third party SSL” and that “the DNS Zone at the cPanel (zone editor tool) can not be used so far”. They also tried to sell me numerous pay-for alternatives and increased the cost of my hosting by around £30 a year. Long term I could move to a new hosting provider that does offer this, but short term, I needed a quick fix.
This guide assumes that your WordPress Multisite is already setup, that the sites in question are already up and running (so just require an SSL certificate), and you’re using cPanel (the most popular web hosting control panel).
If you’re using sub domain addressing (e.g. dragoncode.co.uk and newsite.dragoncode.co.uk), you’ll only need the one SSL certificate, installed for that one domain (dragoncode.co.uk). If using multiple domains for multiple sites, you’ll need a certificate per domain (e.g. dragoncode.co.uk and pointandshooter.co.uk).
Steps
- Add Domain in cPanel
- Email Account for Validation
- Generate a Free SSL Certificate
- Install Certificate
- Handle Mixed Content Issues
-
Add Domain in cPanel
If not already done, create a domain for your child site in cPanel using ‘Addon Domain’ (under Domains). These should all point to the same document root (with dragoncode.co.uk being the parent site in this example), similar to below, but changing the details to match your sites/setup:
New Domain Name
managerdiary.co.ukSubdomain
addon-managerdiary-co-ukDocument Root
additional_domains/dragoncode.co.uk/public_htmlEach addon domain creates a separate virtual host. To serve SSL encrypted content, cPanel creates a new virtual host that mirrors the non SSL virtual host. This new virtual host adds the necessary configuration parameters for your SSL certificates.

-
Email Account for Validation
Make sure you have an email account setup for the domain name (e.g. admin@managerdiary.co.uk for this example). This could be a simple forwarder. You’ll need to be able to access the emails from this account in the next step. The email address must be on this domain to pass the validation process of your certificate.
-
Generate a Free SSL Certificate
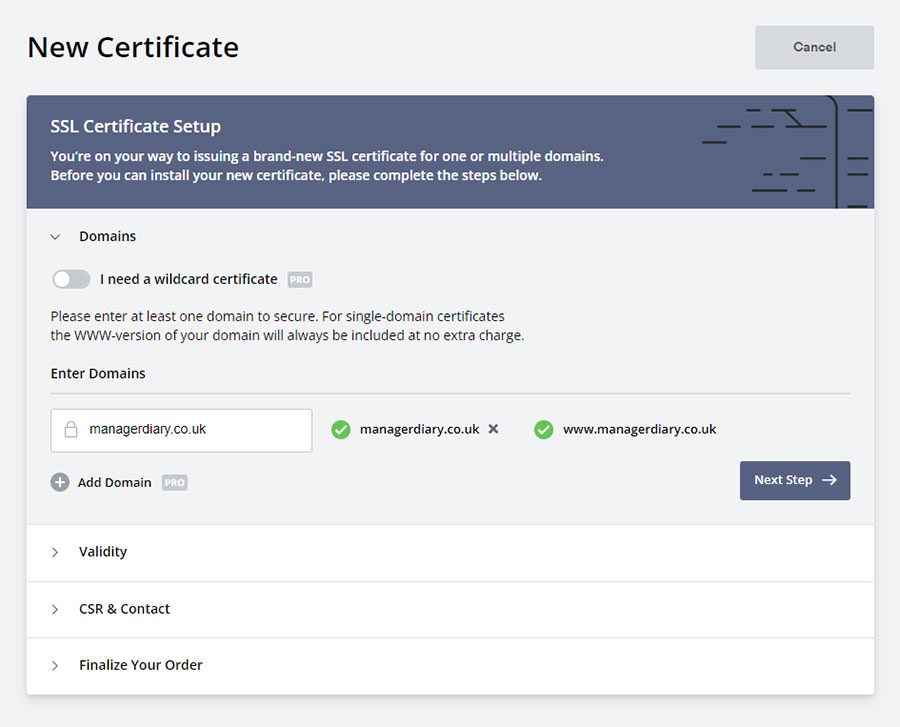
Go to the SSL For Free website and click ‘new certificate’. Type in your new domain name and click ‘next step’ (alternatives include: Free SSL Certificate Generator by PunchSalad, SslForWeb – free but requires and account), SSLFree.
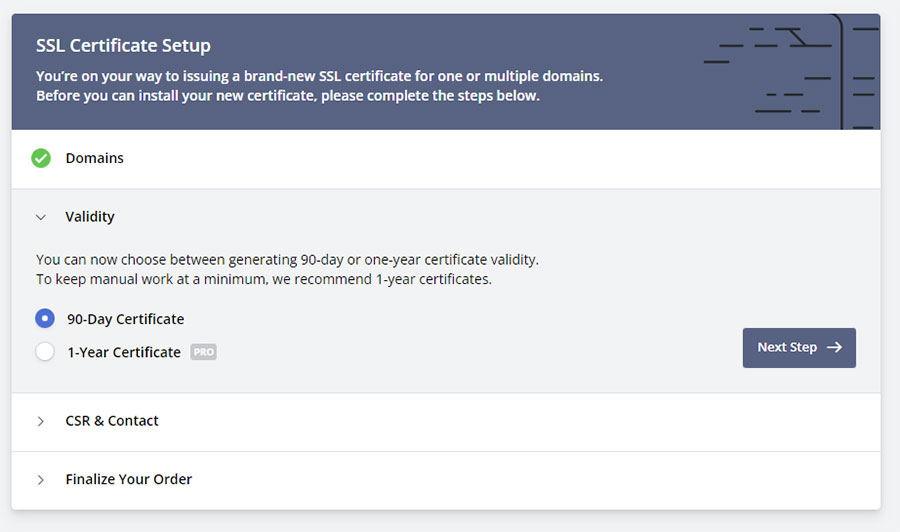
Choose ’90 day certificate’ and click ‘next step’:
You’ll be asked if you want to auto-generate contact information and a CSR for your certificate – leave this enabled and click ‘next step’.
Double check that ‘free’ is selected from the options and again, click ‘next step’.
Next, you’ll be asked to provide an email address to validate the certificate. Enter the one you created in the previous step and continue. Follow the instructions in the email to validate the certificate.
Once validated, download the zip file containing your certificate files.
-
Install Certificate
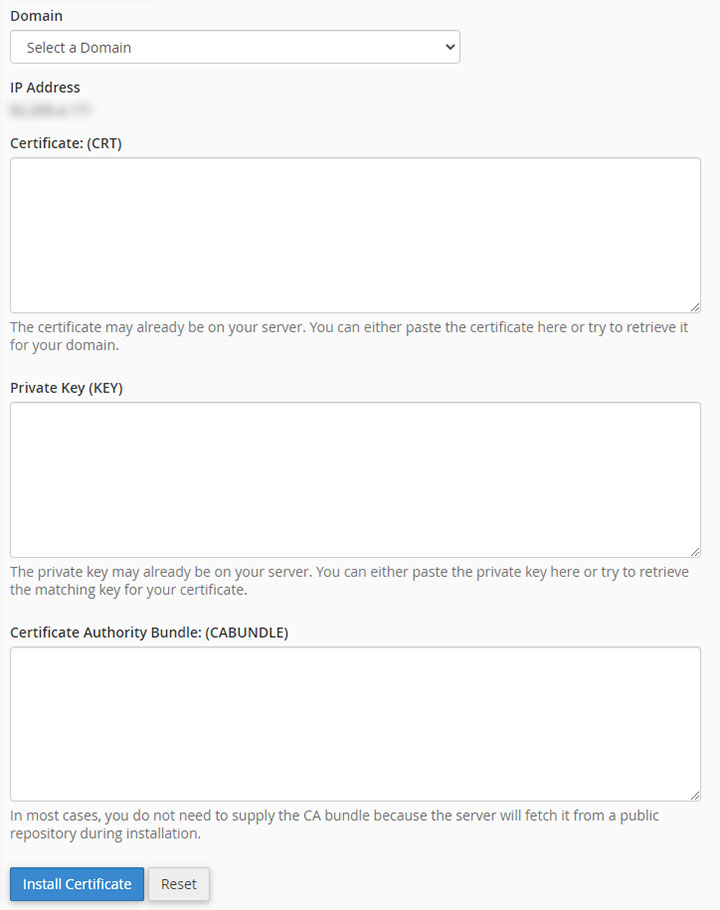
In cPanel, go to ‘SSL/TLS’ under ‘security’ and click ‘manage SSL sites’.
Scroll down to the options shown below and choose your domain, then open your certificate files in your favourite text editor (e.g. Notepad ++) and paste their contents in to the appropriate fields, then click ‘install certificate’.
If successful, you’ll now have an active SSL certificate for the next 90 days. Repeat this process just before the 90 days are up to ensure SSL encryption remains active on your site.
-
Handle Mixed Content Issues
In WordPress, install and activate the Really Simple SSL plugin (you can either network activate this or activate it individually per site as you add SSL). In the settings make sure ‘mixed content fixer’ is toggled on. This will ensure that any http links are redirected to https.

In Network Admin > Sites in the backend of your WordPress Multisite, ensure the site in question is using https for its site address. Amend if not.
E.g. https://managerdiary.co.uk/
Next Steps
The method above is aimed at novices/beginners, which requires you to manually renew certificates as and when needed. To make this process more efficient, we’d want the SSL certificate process to become more automated; with the certificates auto-renewing by themselves. I’ll aim to add these steps in a future post.
If you found this useful, have suggestions on how it could be improved or extended for auto-renewals, or simply want to offer some helpful additional thoughts, please do feel free to add these in the comments below.
Comments
Whether you have feedback, a question, want to share your opinion, or simply want to say thank you - we welcome comments! Please read the disclaimer.