SharePoint: Send Microsoft Form Data via Email using PowerAutomate


Categories
Tags
Using a ‘flow’ in SharePoint’s Power Automate app, you can set your forms up to email data whenever someone submits a response. We also look at how to add form uploads as email attachments.

Steps

  1. Create your Microsoft Form
  2. Go to PowerAutomate (in your Office 365 apps), click ‘create’, then ‘instant cloud flow’, then ‘skip’
  3. Where it says ‘untitled’, enter a name/description for your flow, e.g. ‘Form to Email Test’
  4. From the options under ‘all’ select ‘Microsoft Forms’
  5. From the ‘triggers’ select ‘when a new response is submitted’
  6. Under ‘form id’ choose your form and then select ‘new step’
  7. From ‘choose an operation’ type ‘form’ and choose ‘Microsoft Forms’ from the list of options
  8. Under ‘actions’ choose ‘get response details’
  9. Again, select your form under ‘form id’ and for ‘response id’ select ‘response id’, then click ‘new step’
  10. Under ‘choose an operation’ type ‘outlook’ and select ‘Office 365 Outlook’ from the options
  11. Select the ‘send an email V2’ option for your action
  12. Type in the email address(es) you want to send the data to under ‘to’
  13. Type in a ‘subject’ for the emails (what the email is/is about). You can also add dynamic content from your form fields to customise this
  14. For ‘body’, type in the various field names from your form under dynamic content, to add these to your email (these might include fields like Your Name, Your Email, Your Comment etc). You can manually type in words around the dynamic content to add labels for example
  15. In advanced options you could even add ‘responders email’ (as dynamic content) under ‘from’ and ‘reply to’. That way, the email will appear to be from the user who filled out the form, and if you click reply to the email when you get it, the reply will be to them too
  16. Once finished, click ‘save’. Go back to your form, preview it, and complete and submit a form entry to test it’s working correctly

How to Add Form Attachments to Emails

Need to add attachments to your emails? The below flow shows how this can be done and works if there are no attachments, one attachment, or multiple. In a nutshell, we create an array to store the attachment data and an object of the upload form field using compose. Our condition then check the compose object to see if any data exists (i.e. if we have any attachments). If the object’s length is equal to zero (so ‘if yes’) we can go straight to sending the email as there are no attachments, otherwise (‘if no’) we can parse the data, append each attachment (with it’s properties) to the array we created earlier, then add that array to ‘attachments’ in the send an email action.

The schema used for the parse JSON action can be found further down the page.
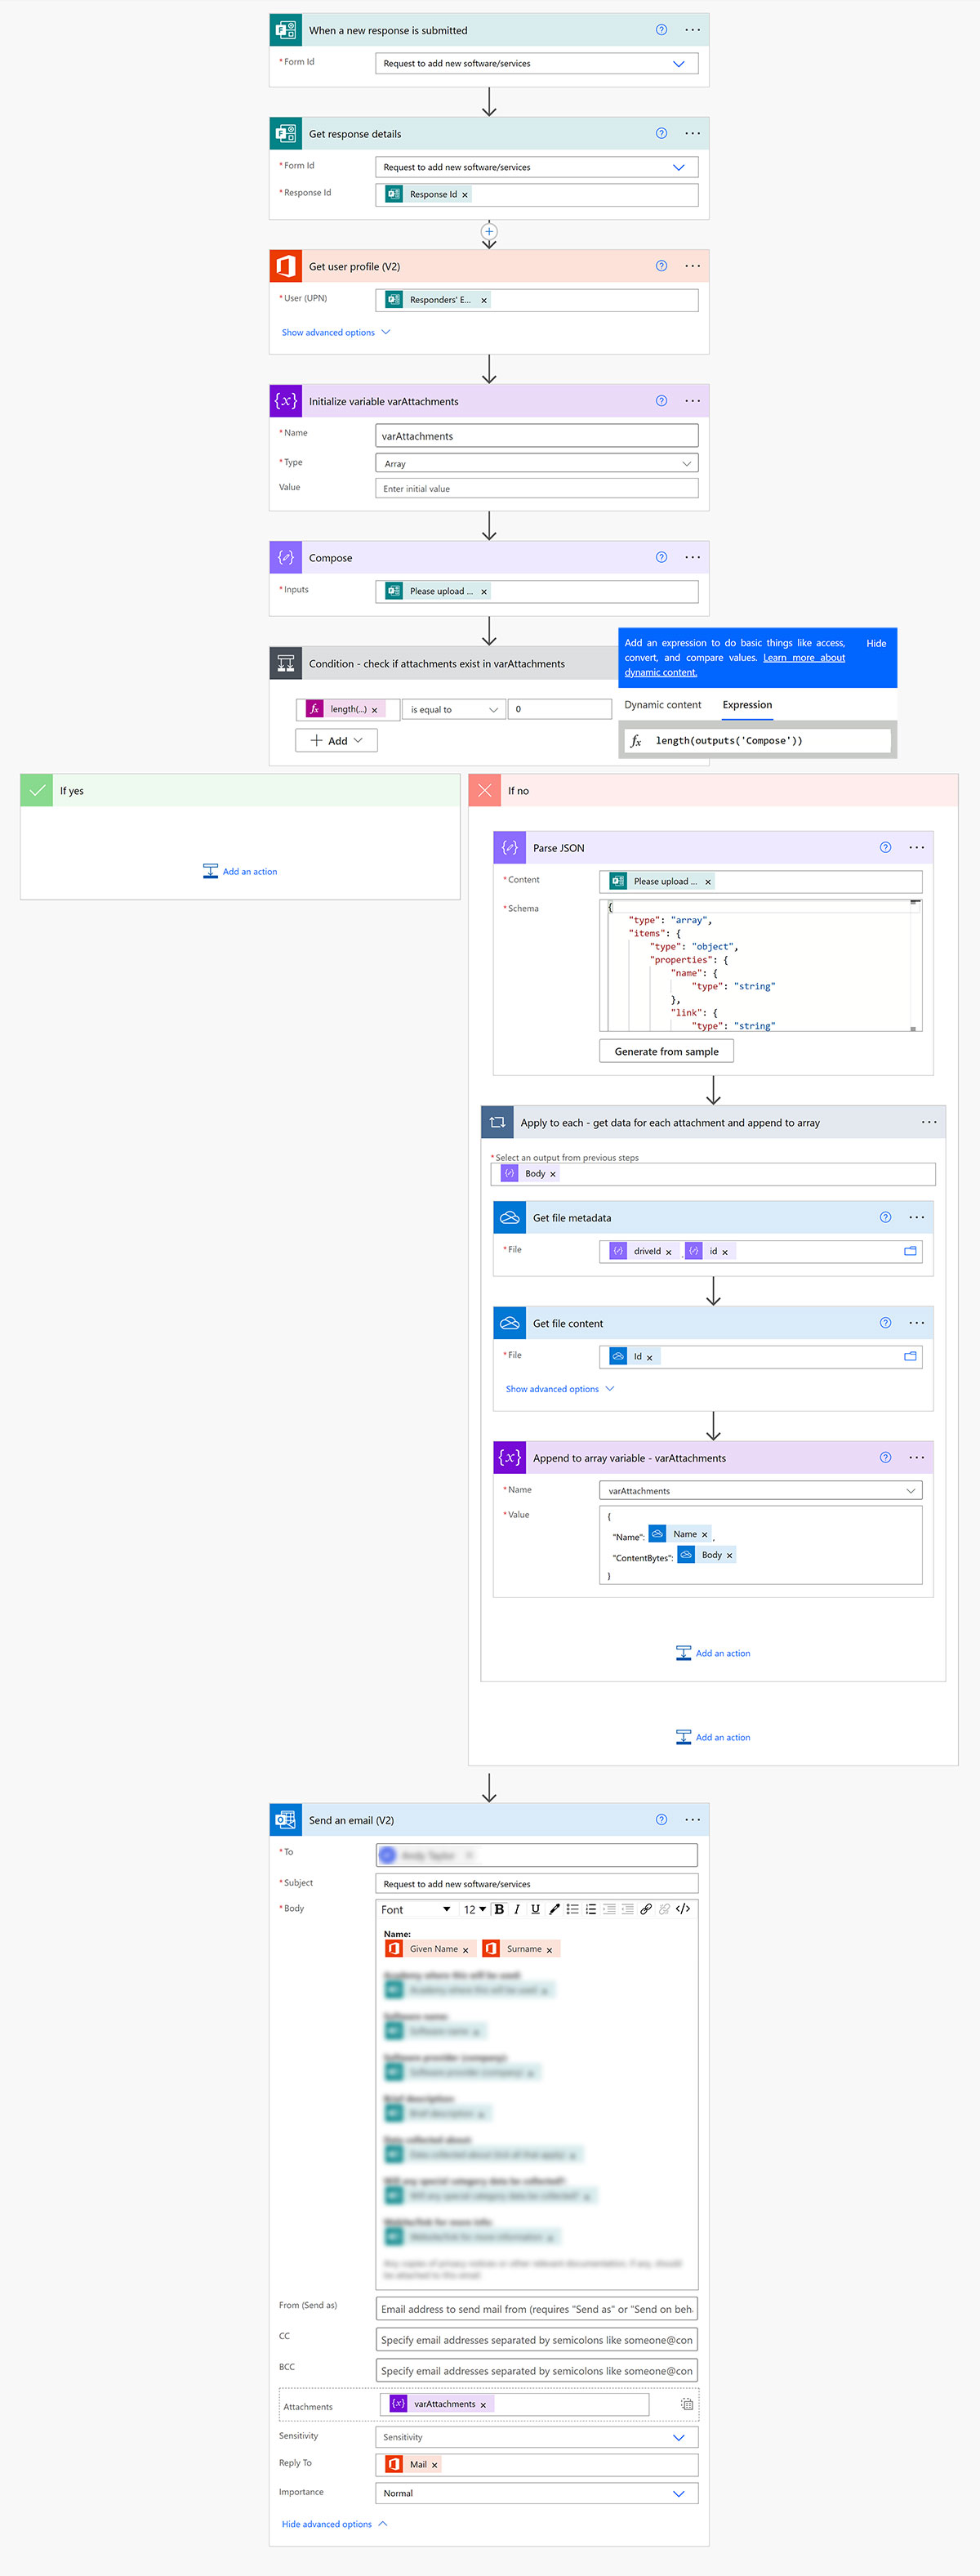
View flow in a new window

Parse JSON schema:

{
    "type": "array",
    "items": {
        "type": "object",
        "properties": {
            "name": {
                "type": "string"
            },
            "link": {
                "type": "string"
            },
            "id": {
                "type": "string"
            },
            "type": {},
            "size": {
                "type": "integer"
            },
            "referenceId": {
                "type": "string"
            },
            "driveId": {
                "type": "string"
            },
            "status": {
                "type": "integer"
            },
            "uploadSessionUrl": {}
        },
        "required": [
            "name",
            "link",
            "id",
            "type",
            "size",
            "referenceId",
            "driveId",
            "status",
            "uploadSessionUrl"
        ]
    }
}

Alternatively, the videos below explain how to do the same thing using a ‘scope’ action, and how to dump these files into the documents of a SharePoint site too.

How to add form attachments to an email (this example fails if no attachments exist):

You’ll find that the above works well if one or more attachments exist, but you’ll get an error if there are no attachments, i.e. for an optional question. The video below, by the same creator, expands on this by showing you how to handle non-required file upload questions using the ‘scope’ action:

Comments

Whether you have feedback, a question, want to share your opinion, or simply want to say thank you - we welcome comments! Please read the disclaimer.

Disclaimer and Legal Information

The use of any content found on or via this website (code, how to guides etc.) is done so at your own risk. We take no responsibility for any issues encountered.

This blog and its authors will not be held responsible for any misuse, reuse, recycled and cited/uncited copies of content from this website by others.

The views and opinions expressed in this blog are those of the author(s) and do not necessarily reflect the position or opinion of any other agency, organisation, employer or company.

Comments are moderated but we do not take any responsibility for any libel or litigation that results from something written in a comment. We reserve the right to reject or delete any comment for any reason whatsoever (abusive, profane, rude etc). Please keep your comments polite and relevant.

We are happy for you to quote and share our content in any reasonable manner, e.g. post links to our blogs on social media, but not in any way that suggests that we, or our authors, endorse you, your use or your views. Nothing negative please.

We appreciate attributions, e.g. a link to our website (www.dragoncode.co.uk).

Thank you – we hope you find the website useful.