Just purchased an SSL certificate and need to activate it in Plesk? Learn how in this guide.
- 05 September 2019
- IT Support (2)
- Security (2)

Get your Files
For the purposes of this example I’ve already ‘renewed’ my certificate (not ‘re-issued’ it) and gone through the validation process.
Once you’ve purchased your SSL certificate, download all of your certificate files. Instructions for this will vary depending on your hosting/certificate provider. I’ll be using the control panel for 1&1 IONIS in this example:
- Sign in to the 1&1 Control Panel (or other provider’s customer area)
- Click on ‘SSL Certificates’
- Click on your domain name
- From advanced settings download all of your certificate files (SSL, PFX, Intermediate etc)

Add SSL Certificate to Plesk
- Sign in to Plesk
- Go to ‘Websites & Domains’
- Click on ‘SSL/TLS Certificates’ for the appropriate domain name
- Click ‘Add SSL/TLS Certificate
- Fill out the general details: name, address, domain name, email etc
-
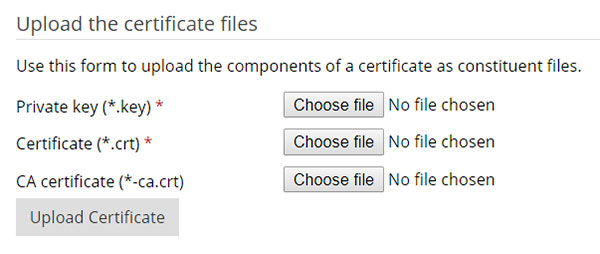
Further down you’ll see ‘upload the certificate files’. You’re asked to attach a private key, certificate and CA certificate. For each of those attach the following:
- Private key (*.key) = your file with .key extension
- Certificate (*.crt) = your file with .cer extension (NOT intermediate)
- CA certificate (*-ca.crt) = your file with .cer extension (intermediate)
Employ SSL
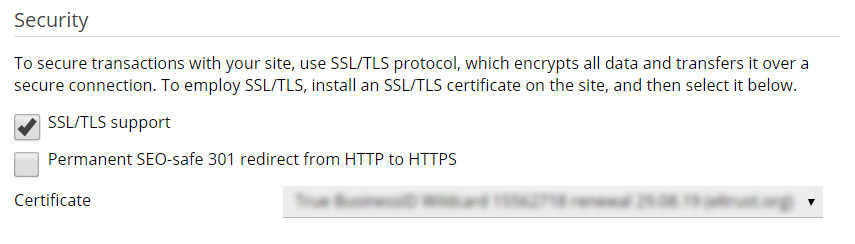
Lastly, you’ll need to associate your SSL certificate with your domain name and enable it:
- Sign in to Plesk
- Go to ‘Websites & Domains’
- Click on ‘Hosting Settings’ for the appropriate domain name
- Check the ‘SSL/TLS support’ check box and choose your certificate from the drop down list (the one you named earlier)
- Apply changes
Comments (1)
Whether you have feedback, a question, want to share your opinion, or simply want to say thank you - we welcome comments! Please read the disclaimer.
merci beaucoup vous m’avez sauvé la vie ca fonctionne .